At your suggestion, I entered this photo into The National Photography Competition and it is one of 50 finalists to be included in an exhibition at the von Liebig Art Center in Naples, Florida that will run from May through August. Stay tuned to see how I fare in the final round. Sadly, I won't be able to attend the opening reception in May to hear the announcement of the grand prize winner and a lecture by the judge, Harry Benson. I admire his photography.
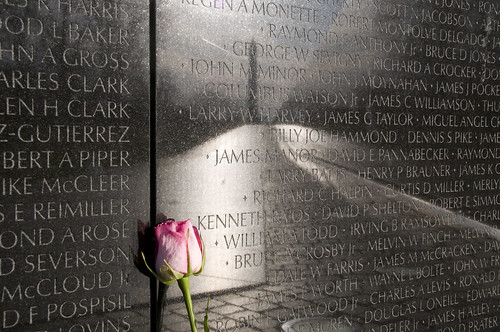
This photo is one that I took on one of my recent trips to DC. It is of the a reflection of a path towards the Washington Monument, reflected in the wall of the Vietnam Veteran's Memorial. The wall is made from gabbro, a mineral chosen from its highly reflective quality. Enscribed on the wall are the 58,175 names of US forces killed or missing in action from the war.
I took the photo with my Nikon D300 (handheld because the park police frown on tripods on the mall) with a small aperture (f 16) to have a long depth of field to get as many names in focus as possible and a shutter speed of 1/125 (ISO 200). I got lucky with this shot and had to do very little processing in Photoshop.
Tuesday, April 5, 2011
Thank you Nilda and Carrie...
Sunday, April 3, 2011
Getting the Most from Your iPhone (Part 4) - Turning Bad Light Into Interesting Light
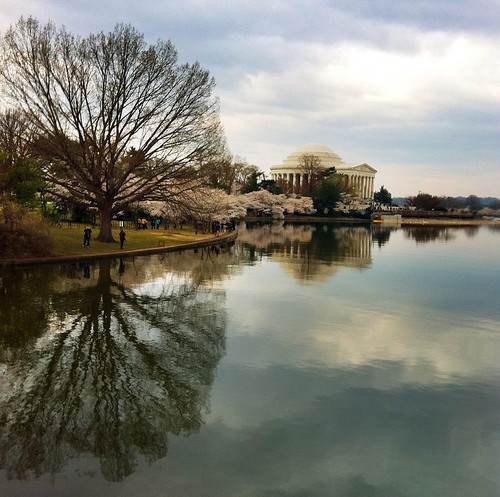
At the most basic level, photography is about capturing light. Imagine that light is being painted onto objects and that you are capturing a moment in time-- the first light of sunrise onto the side of a building, light streaming through a window onto a floor, or a scene fully illuminated by the midday sun. Sometimes, it seems that the light is "bad", on a day where it's cloudy, rainy, etc. In this photo that I took when traveling to DC to photograph cherry blossoms in what I hoped to be scintillating spring sunshine, I instead found myself dodging raindrops and making the most of it with occasional sunbreaks. This photo, Interesting Light, of the Thomas Jefferson Memorial, shows how to maximize less than ideal light for interesting effects.
First: I used the ProHDR app (described in a previous posting) to make the most of the available light and even out the bright areas and the shadows.
Second: I maximized the use of reflection. By including the reflection in the Tidal Basin to essentially "double" the light. By having the bright patches of sky appear twice, it lightens the photo. Reflections in general add interest to photos.
Third: Include elements with high contrast, especially white objects, e.g. in this the dome of the monument and the cherry blossoms on the trees. These also serve to multiply light by having additional elements reflect light back to your eye.
Sunday, March 27, 2011
Getting the Most from Your iPhone Camera (Part 4) - PhotoPad, a Versatile App for Adding Effects

 As you can see from these two photos, there's a wide range of things you can do with your photos once you've taken them. Both of these edits were made with the PhotoPad app. In the top photo, I wanted to make the regular photo of a scupture at Gettysburg National Park have a more vintage appearance. In the second, I wanted to add a caption to the photo of apples. In the first, I used the "chromaticity" tool under the buttom with the symbol showing sliders. In the second, I used the paintbrush tool under the button that looks like a suitcase. There's also options for cropping, rotating, and red eye reduction. The edits are a little tricky on the iPhone because of the smaller screen, but it works well on an iPad.
Friday, March 25, 2011
Getting the Most From Your iPhone Camera (Part 3) - A Fun App, Color Splash


Now you're getting the hang of what you can do with your camera, you have basic photos and you want to have a little fun. So, now I will give a series with a few apps towards that goal:
Today one of my favorites, it is Color Splash: This app allows you to have selective color on your shot, with the rest turned to black and white. The app starts by converting the entire picture to black and white and then you use your finger to paint back in areas of color. The photos above, Red Roses for You, are the pre- and post- using Color Splash. It works best with photos where you have a something in the photo with bright colors (like the roses and the cat's eyes) that accentuating would really add impact. There's a video review here that has a tutorial.
Feel free to download pictures from my Flickr to play with if you want to play with the app without having to take pictures. All you do is go to a photo, click on it, then use the + sign on the upper right hand corner to put it on the lightbox. Then click on the "view all sizes" button, again in the upper right hand corner and choose a size to download. The "medium500" is probably just about right to play with on an iPhone or iPad. My suggestions for ones to try are: Joy, Pas de Deux, S Curve, Water Play, and The Thinker.
Thursday, March 17, 2011
Getting the Most From Your iPhone Camera (Part 2)
Before shooting a lot of photos, you're going to need to outfit your phone with the right apps. Apps will help you take better pictures and allow you to edit them once you have them. My workflow is that I take the picture and if I need to do much editing or I want to take a closer look before uploading, I transfer it to my iPad and then edit and upload it from there. In this blog, I'll cover basic shooting and editing apps.
Apps to take a different kind of picture:
My favorite is Pro HDR. It's the app that I used to take the picture above. I have more on HDR in a past blog, but basically: most cameras cannot capture the full dynamic range that the human eye can see. Even with the best camera, there are areas that are too light and others too dark and you lose detail in those areas. In HDR, there are multiple images (usually at least 3) with underexposure to capture the dark areas (but losing the sky) and overexposure to capture the light areas (but the darker areas lose all detail. Software then smart averages the images to create the best. For this you could spend $100 for your desktop or $1.99 in the app store. Pro HDR requires holding the camera still while the camera analyzes and then takes two shots (one under and one overexposed) and then blends them. You can do final edits. It adds a cool look to a lot of different scenes but is essentially in those tricky lighting situations. Don't expect to get moving objects those because moving objects can take on a ghost like appearance (which in itself can be cool).
Apps for photo editing: I use Photogene or PS Express in my iPhone and Photo Pal or PS Express on my iPad. In these, you can crop out areas (remember that trash can from the previous blog?), adjust the lighting and other special effects like adding frames or captions. Most photos require a little sharpening-- making it look better focused than it is available in all of these apps. Auto-leveling is available in all of these too, which you can make adjustments to bad exposures without having to know a lot about photo editing. These apps also have options to take the picture and upload from within the app to Facebook, but I usually upload through the Facebook app on the iPhone or Friendly for Facebook on my iPad.
In my next blog posting, I'll cover apps to do more fun and special apps.
Wednesday, March 16, 2011
Getting the Most From Your iPhone Camera (Part 1)

For all you Verizon people that just migrated to iPhone, I'm going to post a series of blogs to help you get the most of your iPhone camera. It's really quite remarkable for a cell phone camera and has higher ratings than the competition. I'm assuming that most of you don't have a lot of technical knowledge about cameras, so I'll review some of the basics about cameras as well. Over the last 247 days of my iPhone photo a day project, I've learned where I can push the camera to do more than you would think (like the photo above). For this blog, I'm going to focus on the difference between this camera and other entry level point and shoot cameras and cell phone cameras.
First of all, how is this camera different from one of the point and shoot cameras you could buy at Best Buy that would cost around $100? Well, obviously they can't also make phone calls or immediately text or email the picture you just took to someone and you usually can't edit pictures within the camera (more in a future blog about that), but there's more than that. This blog has all the technical specs for those of you who are interested in numbers.
The iphone camera has a fixed lens, not a zoom (the button on a camera that makes it so you can get closer or farther from your image without actually having to move your feet). You can make it look like you're zooming in on something but tapping the screen (a box appears) and then sliding the bar at the bottom. But, you aren't really zooming, you're just magnifying the image . This is important, because the image is going to look fuzzier. With a camera with a zoom, the optics change so you won't lose as much resolution, i.e. it won't get as fuzzy. That being said, the best solution is to move your feet and yourself closer to the object so that what you want is in the frame-- not the garbage can next to the object of your desire or the random person smoking in your shot. The size of the iPhone lens after all the math is done, makes it compare to a 28 mm lens. This is a fairly wide angle lens, similar to the widest angle of most point and shot cameras you'd buy.
iPhone 4 has two cameras-- one on the back for taking pictures (and videos) and one on the front so you can project your face into the world. The front facing camera is not of the same quality as the rear facing camera and should only be used for Facetime/Skype/etc. or if you don't care about having poor quality pictures of your face.
iPhone 4's light sensitivity is better than the previous models and similar to most Best Buy entry level cameras. Light sensitivity is important when you are shooting in areas where the light isn't great. If the light is poor, the camera works hard to capture the available light by maximizing other settings with a result that the image is grainy (little dots in the picture, especially in darker areas) and with a slow shutter speed (making motion visible for instance someone waving may look like she has a flipper instead of a hand). There's a flash on the iPhone 4, but I haven't found it particularly useful. It tends to wash out the photo without adding any real illumination. A remedy for low light graininess and movement artifact: turn on the lights in the room-- another move involving your feet rather than technology! The photo above of a sailboat on the island of Molokai in Hawaii was taken just before dawn, showing just how well the camera performs in low natural light. The sun is a little washed out, but there's still good detail in the dark areas of the boat.
Does size (of pixels) matter? Yes. Pixels are the electronic sensors that capture light. Most consumer point and shoot cameras have about 10 megapixels, the iPhone has 5 megapixels-- previous iphones had 3-- the bigger DSLR cameras have 10-15. The pixel count, size, and quality determine how large you can blow your picture up without it getting grainy and blurry looking and how sharp it will look on the screen. While the iPhone has only 5, Apple uses superior technology to others so that density and size is maximized, similar quality to 8 megapixel point and shoot cameras. In head to head tests to other cameras it consistently performed as well or better.
So, how does all of this matter? For people that just want to post to Facebook or text their photo it probably doesn't matter too much. For people who want to have the option of printing their photos (probably a max of 5x7, maybe could get away with 8x10's), the iphone is superior to most other camera phones and is going to be at least as good as an entry level point and shoot. What this means is that you don't have to buy another camera or if you already have one you can leave it home and not have to stuff your pockets with gear. Also, most people tend to carry their phone with them, but not always a camera.
In the words of Chase Jarvis (a famous photographer), "The best camera is the one with you."
In the next blog, I'll talk about some apps you can use to enhance your picture taking experience and results.
Tuesday, January 25, 2011
Kalaupapa National Historic Park
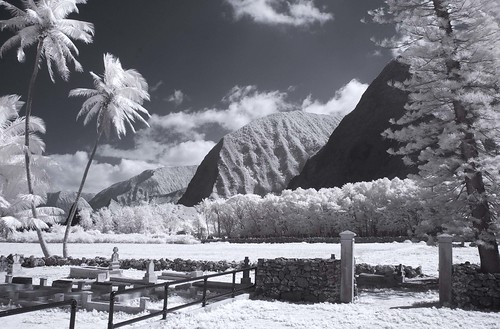
Kalaupapa, on a peninsula on the north shore of Moloka'i (Hawaii) is former leper colony that for over 100 years was forced isolation (until 1969) for patients with Hansen's Disease (leprosy) in Hawaii. In 1969, the isolation was ended, but remaining former patients who chose to live there still reside.
The cemetery, at St. Philomena's church on the Kalawao side of the peninsula has marked graves on the left for members of the Sacred Heart order who ministered there, but the larger field contains hundreds of unmarked graves of patients who died. Their condition was exacerbated by the harsh conditions of the area and many died of pneumonia, tuberculosis, and gangrene.
Leprosy was introduced into Hawaii in the early 19th century. With no treatment, it quickly became a public health issue with no clear scientific answer other than isolation. Initial efforts, mishandled by government officials, to isolate patients in Honolulu failed with the facility turning into more of a prison than a health care facility. Anarchy reigned, there wasn't enough food, and very little health care was provided. People with leprosy were so afraid to go there that their illness was only discovered in late stages after infection had already spread to others. It was also easily visited by families and by others who then went on to complain about the conditions.
The solution was to move many of the patients to an isolated area on the next island over, Molokai, on a peninsula that could only be reached by boat or by traversing down sea cliffs that are the highest in the world. Patients were "settled" in a valley that wasn't even used in the winter by native Hawaiians due to its harsh winter weather and 100 inches of annual rain fall. The patients, many with advanced disease, were expected to farm the area to grow their own food and had construct housing from tents and materials they could find. The result was more anarchy with the strongest patients preying on the weakest for available resources.
It was into this that Father Damien went in the late 1860's to minister to the lepers and ended up creating some order, actually provided health care to the patients (and contracting leprosy himself) and getting the message out to the world of the need for more resources. The colony became a cause celebre back in the US with various celebrities taking on the cause (much like Brad Pitt and George Clooney do today only it was Robert Louis Stevenson and Rudyard Kipling). Father Damien was not popular with Hawaiian or church authorities who felt that he was seeking fame and they blocked much of his efforts.
As he was dying, Mother Marianne Cope, a Franciscan mother superior in Syracuse, NY decided to go to Hawaii to help the lepers and recruiting a number of sister nurses to accompany her, making a prophesy that none would contract leprosy-- she also instituted strict infection control measures. She continued Damien's work after his death soon after she arrived and is credited with bringing order and modern facilities and medical science to Kalaupapa. The colony was moved to the other side of the island, a hospital and housing were built and a school/orphanage for the children of the patients who had died or were too sick to care for them.
Today's Kalaupapa is a National Historic Park and designated as a place for learning the lessons of the past on how this vulnerable population was treated and as a place for reflection. Fewer than 20 former patients still live there with the only other residents being state public health officials to help care for them and national park personnel to maintain the grounds and facilities. You can reach it by flying in (my choice), hiking in, or by mule ride down the cliffs. If in Hawaii in Molokai, Maui, or Oahu it is a must see.
This photo is Infrared taken with an infrared converted Nikon D70, settings: 1/200 sec, f 11, 24 mm. For more photos of Kalaupapa, Moloka'i, and Oahi, go to my Flickr feed.